前言
参考:
- Hexo基本环境搭建: https://blog.csdn.net/weixin_45019350/article/details/121901433。
- NexT主题仓库:https://github.com/theme-next/hexo-theme-next
- NexT主题使用配置教程:NexT主题使用配置教程文档
- Vercel部署Hexo博文:vercel部署hexo
也是一时兴起,花了两三天时间使用Hexo搭建了一个个人博客,个人博客链接: https://www.halfmantou.xyz/ 。目前已经将CSDN所有的博客迁移过去了。当然为了通用性,CSDN的博客还是会持续同步更新。
搭建和部署的过程当中也是或多或少遇到了一些奇奇怪怪的问题,于是特意写此篇阅读来记录一些点点滴滴。
Hexo博客搭建
需要预先准备的环境如下:
- Node.js v18.19.0(我当前电脑本身装的是这个版本,版本其实不做什么要求!)
- Git(不限版本)
- Win11
本文是Hexo教程,默认用户是了解Git的,所以对于Git、Nodejs环境搭建和使用不做任何讲解!!!
搭建hexo博客命令如下:
1 |
|
网站生成与测试:
1 | # 网站生成 |
根据日志提示在浏览器当中输入localhost:4000可以访问到一个最简单的hexo欢迎页。
目前项目结构如下:
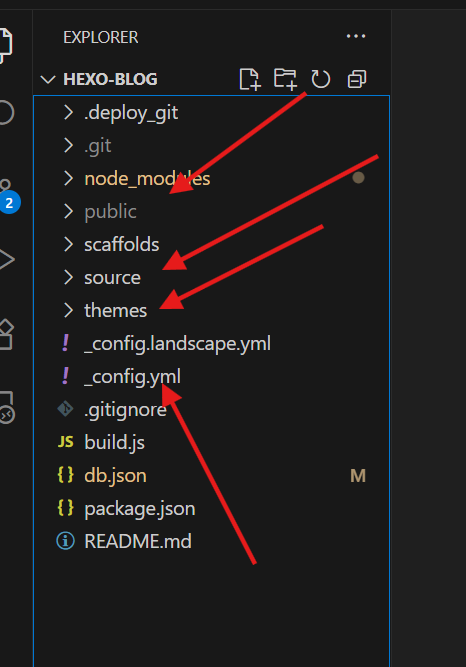
- public:
hexo generate命令生成的html静态网页。 - source: 我们.md博客存放的目录。主要放在_posts文件夹下。
- themes: 主题代码存放目录,后面我们会给hexo换主题。
- _config.yml: hexo的一些配置信息。
本小节参考自:https://blog.csdn.net/weixin_45019350/article/details/121901433。该文当中还讲解了如何将hexo部署到github。最终是将hexo生成的pulibc目录部署到了github,可以通过形如:https://用户名.github.io/方式去访问。并且也提到了由于github访问速度过慢,采用国内的gitee page的方式部署hexo,但是gitee page 机制在2024年已停止使用。所以找来找去,我采用了 花7块钱买了一个国内域名 + vecerl + github的部署方式。成功保证国内可以流程访问我的个人博客,具体部署方式在后面小结进行详细讲解。
移植主题
挑来挑去,我最终选择了NextT主题:https://github.com/theme-next/hexo-theme-next,具体主题的移植方式可以参考github仓库docs当中的 文档。该文档是对linux用户友好的,使用的是curl命令组合。在win用户可以直接把发布的最新版本下载下来,然后解压到themes目录,重命名为next。然后修改顶层_config.yml文件:
1 | theme: next |
使用 hexo clean && hexo server 命令可以看到博客页面主题效果。
一眼看去,你一定会觉得不太对劲,为啥导航栏可能只要 首页/归档 两个页面?和想像的不一样啊?这是因为主题配置文件默认配置比较简单,并且我们的source目录下本来就没有创建关于/标签/分类/归档页面。
NexT主题使用配置教程文档有你想要的关于next配置一切问题的解答,这里就不过多废话。
博客迁移
博客迁移的过程当中,最大的问题是就是markdown文件当中图片路径问题。经过一番搜索,需要改顶层的_config.json
1 | post_asset_folder: true |
这样按道理hexo会在xxx.md文件同级目录下生成xxx目录,用于存放图片。此时md当中可以使用./xxx/p.png的方式使用相对路径用于图片。
但是,图片还是加载不出来,调试半天发现网页在请求图片时,路径不太对。使用浏览器调试抓包请求路径如下:
1 | http://localhost:4000/.com//photo/PipelineAndFlow.png |
这肯定就不对,经过一番搜寻网上大部分结果都是建议将hexo-blog/node_modules/hexo-asset-image/index.js当中的:
1 | $(this).attr('src', config.root + link + src); |
修改为:
1 | $(this).attr('src', src); |
这么改确实可以解决在我们点进文章后,图片加载失败的问题。但是我后来发现,在首页预览文章时,如果带有图片,图片还是没加载出来,经过浏览器抓包,文章内部图片请求路径没有问题,但是首页请求图像路径还是存在问题。最终调试hexo-asset-image的代码发现首页请求的路径居然是相对路径。
其实应该这么改:
1 | ; |
和源码对比,其实就改了一行:
将原来的:
1 | var endPos = link.lastIndexOf('.'); |
改成了:
1 | var endPos = link.lastIndexOf('/'); |
至此图片路径问题就解决了。
博客部署到Vercel
前面提到我的部署方式为: 花7块钱买了一个国内域名 + vecerl + github的部署方式
首先在github创建一个仓库名为hexo-blog(可以任意取名),然后需要将我们创建的 hexo-blog 目录推送到GitHub,命令如下:
1 | echo "# hexo-blog" >> README.md |
然后就是注册vercel账号、创建vercel项目、购买一个国内域名、为域名设置记录等操作。具体流程可以参考:vercel部署hexo。根据链接一步步来按道理是没有问题。每次更新博文后注意忽略pulibc等目录,最好将无需推送的文件放到ignore目录。仅将md和配置更新部分推送到github,vercel会自动到github仓库拉取最新代码,然后编译部署。
但总是有意外,vercel拉取仓库后,在 Hexo build 阶段报错:
1 | sh: line 1: /vercel/path0/node_modules/.bin/hexo: Permission denied Error: Command "hexo generate" exited with 126 |
也是各种尝试,最终是修改了在vercel项目创建阶段设置的build命令,并且在 hexo-blog 项目根目录添加了build.js脚本,绕过了使用/vercel/path0/node_modules/.bin/hexo,解决了该问题。
目前我的Vercel项目 Build Command、Output Directory、 Install Command配置如下:
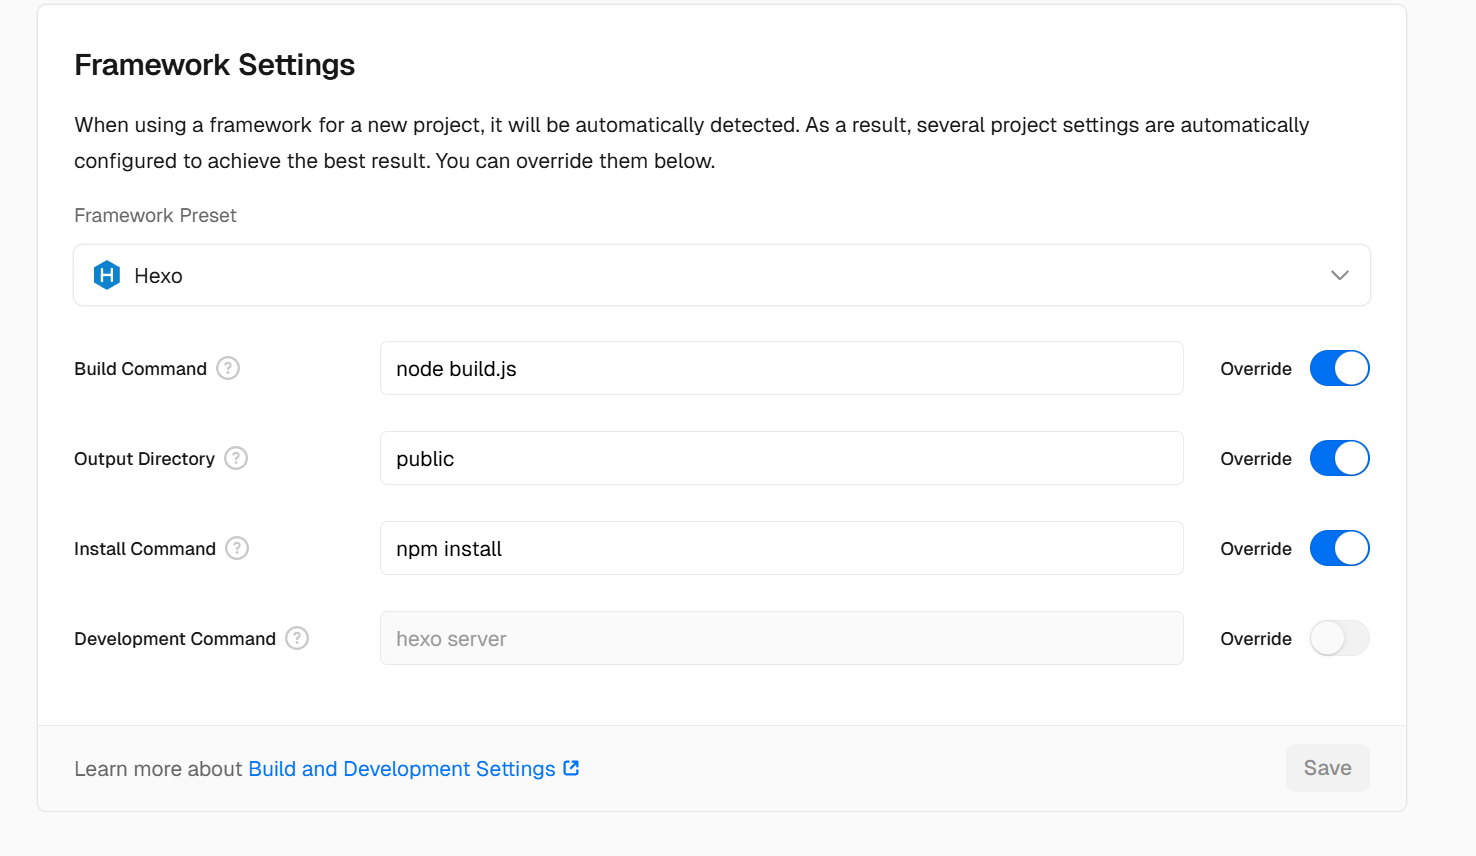
build.js脚本如下:
1 | const Hexo = require('hexo'); |
本章完结